Product Review: Loc-A-Peep Hunter and Whisper Lite Peep Sights
Do you remember when you started using a peep-sight on your bow? I remember it very vividly. At the time, using a peep-sight was a new gimmick. Little did we know that the ‘gimmick’ was going to aid in our focus and help us bring down more animals by improving our shot placement.

For the past few months I have been testing out the Loc-A-Peep Hunter and the Whisper Lite peep sights on my bows. When I spoke with the Loc-A-Peep creator, Jon Bach, (who is also the Owner/Director of X-Ring Archers, the 1999 NFAA National Outdoor Champion and Certified NFAA Expert Level 4 Instructor) I was happy to know that his main goal is not about making money. His main goal is to educate archers and offer them the best products to help them become better archers. He explained why he does what he does and I was impressed. He also mentioned that when I got my peep sights to read the instructions and he highly recommend that I watch the installation video prior to installation. After watching it and going through the paces of installation, I recommend that you and the staff at your pro-shop watch it as well.
A bit of information about the Loc-A-Peep from their website:
THE WORLD’S ONLY LOCKABLE, NO SERVING, PEEP SIGHT SYSTEM
Every peep sight until now had to be “served” or “tied” into place on the bowstring subjecting them to move regardless if they were tied in correctly or incorrectly.
LOC-A-PEEP’S design accomplishes 10 major tasks:
- Movement on the bowstring is eliminated.
- It doesn’t need to be “served” or “tied” into place.
- Cuts down on installation time for shop owners for quicker bow set-up.
- Empowers archers to do-it yourself.
- Skeleton design for lightweight and speed.
- The oval shaped hole increases peep hole size and remains round optically at full draw.
- Since it doesn’t move improved accuracy and shooting consistency.
- Available in black or red.
- Available in kit with different hole sizes.

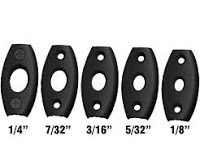
My first task was to bring the peeps over to Archery Outpost and have them installed using their bow press. The first one I had installed was the Hunter Loc-A-Peep with the rubber tubing. It comes with five different size openings. I started with the smallest opening of 1/8″ and had them install it according to the included directions. There was definitely a learning curve for all of us involved. The peep is two separate pieces. You put the bow on the press, leave some tension it and separate the strings in the middle. It is built so that the strings hold the peep in place on either side by force. The major issue was there is no lip on the peep to keep the string from popping back off. This was one of the many discussions we had with the product.
I use a 6-pin set-up and the small aperture of 1/8″ looks to be for the single-pin shooters. I can see where it would be beneficial to have a small aperture with a single-pin, but not for me. For me it just wasn’t working. Not because it was bad, but because I couldn’t see my pins. I had to move the bow all around to get to see my 60 and 70 yard pins. We switched that one out for the next size and moved our way closer and closer to the 1/4″ opening. After testing all five openings, this was the one that worked the best. I could see all of my pins and it felt comfortable when shooting. I wasn’t straining to see the pins or my target. The major benefit with this peep is that you don’t have to serve the string. You tighten down the two screws and you are all set. From my observation, I think the smaller openings would be ideal for treestand hunters with a single-pin sight. You will lose 3-6 fps on speed with the rubber tubing, but you can get either peep with or without it. The great thing about the Hunter kit is that you have five openings to choose from and you can always switch back and forth if you’d like. It give you many options, should you change sights or maybe your eyesight isn’t the greatest (like me).
NOTE: I think that the folks at Loc-A-Peep should consider adding a small lip to keep the string from popping out. This will avoid frustration from you and from the pro trying to install it. If it is kept the way it is I have a feeling people will move on to other peeps. Other than the issue of the string popping off, this peep worked very well. I was able to cinch it down by tightening the screws and when I needed to adjust it up by 1/16″, I just had to loosen the screws and slide it up. I then re-tightened the screws and I was in business. No serving, nothing to cut and no knot tying.

Part two of my review was to test out the Whisper Lite. The model I tested has no rubber tubing and has a rubberized outside to be silent during the shot. Installation of the Whisper Lite was similar to the Hunter. We had to use a bow press, but with this one there are no screws. The string fits in the grooves on either side of the peep. Installation was a snap. I started shooting right away and this is a keeper! It stayed in place after multiple shots and when I needed to adjust it I only had to slide it up or down. If I had to go more than 1/16″ I had the pro put it back on the press and add or remove a half-twist in the string. The Whisper Lite really is silent, too. I never heard a twang or anything out of it. I could see all of the pins and felt very comfortable in my shot. The opening is 1/4″, so it was perfect for me.
The Hunter model is great for anyone hunting in a treestand with a single-pin sight or someone hunting on the ground with a multiple-pin sight. The Whisper Lite works great, too. It just depends on your preference. I like having the Hunter with the rubber tubing because it’s in the right spot each and every time. I might lose a few feet per second, but I am ok with that. You can buy the Hunter kit, with all five openings, or you can get the single peep with the 1/4″ opening. They are reasonably priced, too. After using these new peeps my groups have improved considerably. After more than 500 shots using the two products, I would definitely recommend using one of these for your hunting needs.
Be First to Comment