Product Review: Bohning Tower Fletching Jig
Gadgets, gadgets and more gadgets! I love gadgets and things that make my life easier. I am constantly striving to find good products for me and my fellow bowhunters that will make life easier in the long run. Time is valuable and I want to have more time to hunt and less time working on my gear. For years I have been fletching and re-fletching my own arrows with a single-arrow fletching jig. It has been time consuming, mediocre and sloppy. So, when I got to test out the Bohning Tower Fletching Jig I was excited, but skeptical.
Let me begin by saying that this piece of equipment is capable of completely fletching an arrow – 3 vanes at a time. It fits aluminum or carbons and it is slick. Here are the Tower specs from the Bohning website:
The Standard Tower accepts “press fit” nock style shafts. It will fletch vanes up to 4 inches in length on a 2° right “offset”. Designed for 17/64″ (Axis) up to 23/64″ shafts.
The Helix Tower accepts “press fit” nock style shafts. Fletches vanes up to 2 inches in length on a 3° right “helical”. Designed for 17/64″ (Axis) up to 23/64″ shafts.
The Pin Nock Tower accepts all standard pin systems. Fletches vanes “straight” up to 4 inches in length. Designed for small diameter shafts, such as A/C/E, Nano & X10.
*Standard & Helix Towers offer 4 center post options: Standard Carbon(.240 id) – A-Nock(.201 id) – F-Nock(.164 id) – Xbow Bolts Comes with 2 pressure rings allowing you to apply the perfect amount of pressure on different diameter shafts! Ring marked “S” for standard carbon & small diameter shafts. Ring marked “L” for aluminum & larger diameter carbon arrow shafts!
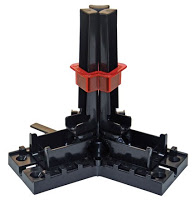
Some assembly was required when I took the Tower out of the packaging. That was the most challenging part of the review. You have to assemble the Tower by attaching the arms to the base. Getting them to pop in to the holes was tough. You definitely have to give it some muscle to get them attached, but once they are in you are golden. My thumbs were on fire after I got them in. You can choose either the 4″ arms or the 2″ arms. I chose the 2″ for my arrows as I am shooting Blazer vanes.
There are holes in the base where you can bolt down the base to keep it attached permanently to your work bench, but I chose to leave it freestanding. With three legs to stand on this was not a problem. It’s made of a very durable, hard plastic, it is very sturdy and did I mention light? The portability of the Tower is a very nice feature.
There is an important lever on the bottom of the Tower. In the image to the left it is on the back, left side. Be sure this is cocked properly before you begin. The directions explain how to set it correctly.
Along with the Tower, Bohning sent me their Fletch-Tite Platinum glue and Blazer vanes. I have become a true believer in the 2″ Blazers. Not only are they easy to install, but they help my arrows fly truer than any of my 4″ vanes did. I also find them to withstand abrasion, shock and inadvertent contact (hitting a rest or target) better. The 4″ vanes tend to warp faster, but the Blazers are tough!
The Tower comes with two arrow-shaft adapters that hold your arrow in place. One is for aluminum arrows and the other is for carbons. You just slide the correct adapter onto the Tower for the arrow you are fletching. It’s really that simple. I put the carbon adapter on and was ready to start fletching my arrows. I am not going to go into steps you need to follow in order to prep your arrow and vanes. That might be a tech tip later on, but right now I want to focus on the Tower Fletching Jig.
After the prep work, you have to take the nock out of your arrow and then slide the arrow onto the adapter tip. It should fit well, but not super-snug. Don’t force your arrow onto the adapter. It should slide on easily. Be sure to use the correct adapter so you get perfect fletching-glue-arrow contact. Once you get your arrow on, you place your three vanes in the slits in the arms. They should go in very smoothly. You’ll have to keep be aware of where the vane sits in the gap. You want the vanes to be aligned and it’s really easy to allow a vanes to slide up. I was sure the slide each vane so it rested on the bottom of the gap.
Apply glue to each vane, lift each arm up to where it’s almost touching the arrow and flip the lever on the bottom of the Tower. This allows the vanes to seat against the shaft firmly. Next, you place the correct pressure ring over the top of the arrow and arms to hold them in place. Wait three to five minutes and you are done. I recommend 5 minutes to be sure the glue has dried. I was able to fletch an entire dozen arrows in about an hour and a half. You can do it faster, but I was very methodical to be sure each arrow was fletched properly. It was nice to have an entire arrow done at one time.
In conclusion, the Bohning Tower Fletching Jig is one of the best single-arrow fletching jigs I have used. It is simple, lightweight, well-built and portable. I was definitely impressed with the design and functionality. I definitely recommend this product to my fellow bowhunters. This product might seem pricey at $65.99, but when you think of how many arrows you can do in as little time as it takes, well, it almost pays for itself.


Al – I tried to comment last night and got zapped. This computer stuff still baffles me. I'm at the office now so will try again.
I think in order to take on the title of Bowhunter you have to have an inherent weakness for gadgets. Sue has been wanting to fletch her own arrows so maybe this is the route to take. She uses the quick spin with the little nubbin on the fletch, you think they will work in this Jig?
I am not sure, Gary. Don't you just have to boil water for the Quick Spins? I have never tried the Quick Spins so I can't say for certain, but I don't think the Tower is made for that type of fletch set up.
I know the Quick spins you are talking about Al, but thats not the ones she has. Its the single fletching that is like all the rest that needs to be glued on individually. The quick spin name I believe comes from that little nubbin that is supposed to make them spin faster thereby making them more accurate. Thats salesman speak!!!
NAP is the company. QuickFletch is the brand. QuickFletch makes the combined wrap/fletch combo you dip in water. Twisters are the standard vanes. And QuickSpin are the vanes with the air-catching lip on the edge of the fletch.
Don't know the speed, but they are designed to make tigher groups (at the expense of some speed). Same arrow, same bow, my twisters drop 2-3" over 20yards compared to my wrapped Blazers with NO offset (shooting tight enough for me!). QuickFletch are either THAT heavier, or the offset slows the speed resulting drop.